Wednesday, July 29, 2009

Watchmaker's Bench

Check out the new addition to my art studio...
This is an antique watchmaker's bench and I'm so happy to have scored it for my art studio. My husband's father is a German-trained watch and clock maker and my husband has taken over his 60 year old business. In the move, this bench was not needed so I snapped it up.

It fits perfectly at the end of my island and it is now the new home for my sewing machine. I've been using my sewing machine more and more and it didn't have a permanent home, so this is perfect.

My husband is going to make a hole in the top near the back so that my pedal wire can slip down through it and not have the wire draping over the front like it is now.
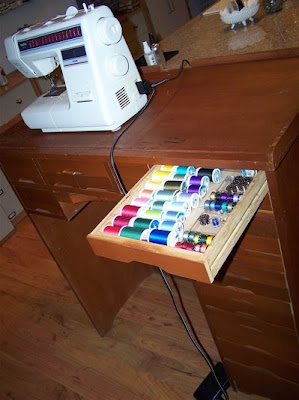
Do you see all of those shallow drawers? Is that a rubberstamper's heaven or what?!

I'm toying with the idea of painting this bench to match my studio but on the other hand, I love the "old" look it has... what do you think? Please leave a comment and let me know if you think I should spruce it up by painting it or leave it as is. Thanks for your advice!

Just Buzzing By...

Well, you've probably noticed that I haven't had much time in my art studio lately. I've been super busy with work, which is good. And even better is the fact that my work is just as creative as my play.

If you are curious about what I do for a living, just click here. Go ahead, I'll wait.... So what do you think? I love what I do and I love that I'm able to make a living as an artist. I primarily sell wholesale to gift shops but from now until December, I'll be a weekend warrior at arts and crafts shows.

Okay, enough of that and back to the fun stuff....
I got a little bit of time in my art studio and created this card to send to my son in Army basic training. The stamps are from A Country Welcome and I bought them many, many years ago.
The background is designer paper. Black grosgrain ribbon and shiny gold brads give the front a nice touch.
The image is colored with SU markers and a blender pen.
I made the bear a little bit 3-dimensional. Here's a closer look.
And here's the inside that matches.

I have something very cool to share with you tomorrow... it's a new addition to my art studio and it's so awesome. Come back tomorrow to see what it is.

Thanks for stopping by!

Tuesday, July 14, 2009

Liberty for All

Here's another patriotic card that I made to send my son in Army Basic Training. I'm making some cards now so that I can send them to him as soon he can receive mail. I'm not even sure when that will be yet. I miss him terribly and hope he's holding up okay with the strenuous boot camp in the 100-plus degree heat in Oklahoma.

Back to the card....
The Statue of Liberty image is from SU and I stamped it in sage shadow pigment ink and embossed with clear embossing powder. The paper is K & Company designer paper.
I added stitching with my sewing machine. Does anyone know the name of that stitch? That and the zig zag stitches are my favorite. If you know the name of it, would you please leave me a comment and let me know? It's the most forgiving of all the stitches so if you are new to sewing on cards, I would suggest trying that one first.
The Lady Liberty charm is from my collection of charms for my jewelry business. Click here to see what I have to offer at really reasonable prices for your artwork.
And here's the inside... matching and stitched also.
Hope you enjoyed this one. Don't forget to go check out Cards for Heros. Click the link at the top of my sidebar.

Monday, July 13, 2009

Two Challenges in One: TPE #22 & CPS #124

Tonight I found some time in my art studio and created a card that fits into two challenges.  The first challenge is The Pink Elephant Challenge #22 (click here to view), which is to create a card with "stars and stripes".  The second challenge is Card Positioning Systems #124 (click here to view) and that one is a card sketch.  Here's the sketch:
And here's my card:
I like the CPS sketch layout and the stars and stripes theme was perfect because I wanted to make some patriotic cards this week.  My 17 year old son who just graduated high school left for Army Basic Training last week and I wanted to make some very special cards to send to him as soon he's allowed to receive mail.  This is the official first one!

I'd also like to take a moment to point out the new link on the top of my side bar: Cards for Heros.  In honor of my son, I am making an effort to support them and I hope you will to.  

Okay, back to my card....
This card uses night of navy cardstock and designer paper.  The stamped images are all SU and are embossed with night of navy ink and clear embossing powder.  
I used my sewing machine to add some stitching detail.
Here's a close up of the sentiment on the front.
And here's the inside of the card with matching details.

I hope you'll join me in support of Cards for Heros and keep all of our soldiers in your thoughts and prayers.  They are very brave and wonderful men and women!

Friday, July 10, 2009

Challenge: Mojo Monday #94

I'm playing along this week in the Mojo Monday Challenge.  Isn't this a great sketch?  You can click here to go to the Mojo Monday blog and see all of this week's wonderful entries.   There's a lot of them and they are giving away great prizes!

I changed the orientation of the sketch for my card.  It just worked better in my mind that way I guess.  Here's my card:

The main stamped panel of this card is a paint chip from the paint department at Home Depot.  I love the color and based my card around it.  I stamped the flower image by Hero Arts (thank you Debbie in Conroe) in black pigment ink and embossed it with clear embossing powder.  
The rest of the layers of this card are designer paper from the K & Company K-ology Scrap Pad to Go called Hannah.  These papers are great.  I love the patterns and they are nice and thick.  And, they are double sided.   What more could you want?!
I added some stitching to give the card some nice detail.  The black grosgrain ribbon and three light blue pearls finish it off nicely.
And this butterfly is the perfect embellishment.  I started with a plain antique gold colored charm and painted it with acrylic paint to match the card.  Once it was dry, a coat of clear nailpolish seals and protects it while giving it a nice shine.  If you are looking for reasonably priced charms, click here to see what I have to offer on my sale blog.  
Here's the inside, layered and stitched to match.
And here's a close up of the stitching on the inside.  What an easy way to give your cards beautiful detail.  

Thanks for stopping by!

Wednesday, July 8, 2009

Glitter & Microbeads

Here's another installment in the "What's Old is New Again" series.   This time I brought out the glitter and microbeads.  This simple but interesting card is done with double stick adhesive and lace.  Here's the card:
This is so easy and fun to do.  First, I ran the top layer of my card through the Xyron to add a layer of adhesive.  You can also use a red liner sheet of adhesive or anything else that will cover your cardstock with a smooth film of "dry" adhesive (in other words, wet glue won't work). 
Next, you lay a piece of lace over your adhesive and gently rub it down so it's pretty secure.  Now you'll pour glitter over the whole thing and use your fingers to burnish it so it sticks well and then shake off the excess glitter.
Now you'll pull off the lace and that leaves the lace pattern on the adhesive.  Simply pour another of color of glitter over it or pour colored microbeads like I did here.  Burnish them onto the adhesive with your fingers and pour off the excess.  Viola!  Now you can layer your card to finish it up.
Here's the finished card with the lace that I used to make the microbead pattern.  It's hard to get a good photo of this one.  It's really nice in real life.  I finished it simply by adding some ribbon and a metal frame around the friendship sentiment.

Thanks for stopping by.  Come back again because I'm still on a roll with "What's Old is New Again".  The challenge of going back and using the old techniques that I have the supplies for is really becoming so fun!  

Monday, July 6, 2009

PS- I added a photo of myself....

I realized that when I'm blog surfing, I love when there is a photo of the artist on the blog.  I love to put a face to the person that I read about so often.  So today I added my picture to my profile.  I'm not the most photogenic person, but I bit the bullet and did it.  

I also love when the artist shows their art studio or art space.  I'm going to work on getting mine in good enough shape to take better pictures of and get that on here too.  That might take me a while though....

Guest Star: An Embellished Wedding Invitation by Jamie Rutherford

How GORGEOUS is this?!!!  This is a beautifully embellished wedding invitation that my sister Jamie created to give as a wedding gift.  It's stunning, isn't it?!   Here are some close ups of this gorgeous creation...


As soon as I saw this, I knew I had to share it on my blog.  I hope you enjoyed seeing it as much as I did!  Makes me want to try my hand at paper quilling... how about you?

Sunday, July 5, 2009

Good News, Bad News and a PSA

Good news!  My laptop is fixed and I'm back online.  Bad news... when my laptop bit the dust, I lost everything on my hard drive.   And worse news yet... I did not have a back up of anything on my laptop.  So here's the Public Service Announcement:  Please learn from my mistake and take the time to back up your hard drive.   From what understand, laptop hard drives are more at risk of having a problem because of heat issues.  (If you are a fellow MacBook user, please also see my note below).

I've had a house full of company this weekend celebrating not only Independence Day, but also the departure of my son to Army Basic Training.  He is headed to Fort Sill, Oklahoma to become a United States Army Soldier.  I'm so proud of him!

Now that the festivities are over and things are settling down, I have time to get my laptop updated with all the programs I lost.  I even lost all of my bookmarks.  I hope to have something artful to post for you all soon!

I hope you all had a wonderful 4th of July weekend!

***Fellow MacBook Users:  Be aware of the symptoms of a failing hard drive.  I noticed that my 2 1/2 year old MacBook was running slower than normal and it was freezing up now and then.  Nothing major... just enough that I noticed it wasn't "right" and I mistakenly attributed it to software problems.   I had an Apple "Genius" take a look at it and he told me it was fine.  Then, when it froze up for the last time and the hard drive was gone, I found lots of forums where others had the same symptoms before their hard drives failed too.  If you are noticing any symptoms in your MacBook, be sure to back up your hard drive, just in case. 

Thursday, July 2, 2009

Oh No! My Laptop is FRIED!!!

I have tears in my eyes as I post this. It seems that my beloved and trusted MacBook laptop just bit the dust. I cannot even believe it. One minute it was fine and the next, DONE. And sadly, I did not have a backup.

I'm letting you all know this because it may keep me from posting any artwork until I get it fixed. I have a problem with my photo editing program on this old PC that I have. I will see if I can resolve that once I'm done having a breakdown over my laptop.

I'm just devastated by the thought of all the photos that may be lost forever. I've done all the troubleshooting to no avail and from everything I've read online about the problem, there is little chance of retrieving anything from the hard drive that has apparently fried.

So... I'm going to take a deep breath and regain my composure. Then I'm going to see if I can find any creativeness in my art studio. Don't you just hate the stress that a malfunctioning computer can give you? So for tonight (or what's left of it) I'm going to concentrate on art.

Tomorrow I will see about using my old PC to add photos here so I can continue posting. Hopefully you'll all hear from me soon. In the meantime, please send calming energy my way, okay?

{BIG sigh...}