Monday, January 30, 2012

Card Patterns #150 Sketch Challenge

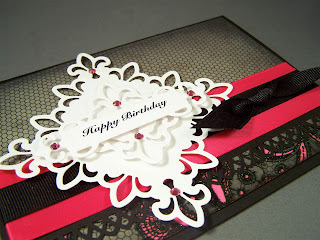
 Here's my card for this week's sketch challenge at Card Patterns.  


 Here is the inside.
 And matching envelope.


SUPPLIES:
Stamps/Images: Sentiment is computer generated and cut out with Spellbinders Fancy Tags.
Paper:  DCWV Street Lace Paper Stack,  Georgia Pacific White Cardstock, Black Cardstock
Ink/Coloring: none
Accessories: Spellbinders Fleur De Lis Pendant Die Cut Set, Spellbinder Fancy Tags Die Cut, Lattice Border Punch, Grosgrain and Satin Ribbon , Rose Swarovski Crystals

Sunday, January 29, 2012

Colour Create #88- Pink & Green

 This card was made for the Pink & Green Color Challenge at Colour Create this week.
 In my collection of miscellaneous items I've received from swaps over the years, I found this 6x6 piece of green baby designer paper and the round green baby rub on and they went so well together that I made a card for this challenge.  
 Here's the envelope.  It's a nice touch to emboss the back flap of a plain envelope to match the card.  So easy to give it a nice matching detail.  

SUPPLIES:
Stamps/Images: Sentiment is a rub on from my stash.
Paper:  Blush Cardstock, Georgia Pacific White Cardstock, DP from my stash.
Ink/Coloring: none
Accessories: Nesties Round Die Cut Set, Accent Essentials Cartridge/Cricut for Scalloped Square, Corner Chomper, Grosgrain Ribbon, Cuttlebug/Embossing Folder, Plastic Baby Pin (from the party favor section of the store), Assorted Paper Flowers, Brad, Flat Back Green Crystals.

You Inspire Me


Here is the card with the matching envelope:

SUPPLIES:
Stamps/Images: Sentiment is computer generated
Paper:  Georgia Pacific White Cardstock and DCWV Luxury Stack.
Ink/Coloring: None
Accessories: Spellbinders Fancy Tags Die Cut, Corner Chomper, Ribbon, Assorted Paper Flowers & Brads.

Saturday, January 28, 2012

"Quilted" Baby Card

 Here's the second baby card to congratulate one of my nieces.  
This one is a "quilt" card.  The main panel of the card is embossed which gives a nice look.  
 The "quilt" is made by punching squares out of embossed white cardstock that is rubbed with pastels to give it some color.  The squares are then glued to the card to resemble a quilt.  
Easy peasy with nice results.


SUPPLIES:
Stamps/Images: Sentiment is computer generated
Paper:  Georgia Pacific White Cardstock and Baby Blue Cardstock.
Ink/Coloring: Pastels- rubbed over embossed white cardstock for soft color.
Accessories: Spellbinders Ribbon Tag Trio 2 Die Cut, Square Punch,  Corner Chomper, Grosgrain Ribbon, Cuttlebug/Embossing Folders, Plastic Baby Pin (from the party favor section of the store).

Baby Card

I have a couple of nieces who are pregnant and that is so exciting.  This is a simple baby card to congratulate one of them.  I love the white on white layers when you emboss one of them with the Cuttlebug.  It's such a nice, clean look.


SUPPLIES:
Stamps/Images: Sentiment is computer generated, Baby Rattle Stamp by SU.
Paper:  Georgia Pacific White Cardstock and Pink Cardstock.
Ink/Coloring: Brown Ink/Sponge for Distressing. Pink, Blue & Yellow Embossing ink embossed with clear embossing powder.
Accessories: Nesties Square Die Cut,  Corner Chomper, Grosgrain Ribbon, Cuttlebug/Embossing Folders, Plastic Baby Pin (from the party favor section of the store).

Thursday, January 26, 2012

Mojo Monday #225- Congratulations

 I made this card with this week's sketch over at Mojo Monday.  


SUPPLIES:
Stamps/Images: Sentiment is computer generated.
Paper:  Georgia Pacific White Cardstock, Saffron Cardstock, Brown Cardstock, K & Company SW Botanicals Paper Pack
Ink/Coloring: Brown Ink/Sponge for Distressing
Accessories: Spellbinders Fancy Tags Die Cuts,  Corner Chomper, Grosgrain Ribbon, Flat Backed Pearls, Leaves and Brown Paper Roses. 

Homemade Envelopes with Labels

 This is just a quick post to show you how I use labels to address the envelopes that I make out of designer paper.  I love making homemade envelopes with my Martha Stewart Scoring Board but the patterned paper makes it so you have to use a label to make the address legible.  

I use large sheets of labels and print the return address and the address as shown above.  You can also print this on regular paper and use xyron or other adhesive to attach it to your envelope.
 Adhere the label so it wraps around the envelope with the address on the front and the return address on the back as shown in the pictures.  
I think this is a nice and different way to use a label on these pretty envelopes.  Let me know if you have other good ideas.  I'm always looking for something different.  

Wednesday, January 25, 2012

Paint Chip Valentine

This Valentine card was inspired by the following challenges:
 I love the sketch at CPS and it combined well with the heart and the zig zag challenges.  The zig zag challenge lead me to the "out with the old" challenge because it immediately made me think of the rick rack that I've had hanging around and never use.  I think it is perfect for this card.  

SUPPLIES:
Stamps/Images: Sentiment is computer generated.
Paper:  Georgia Pacific White Cardstock, Paint Sample Chips from Walmart
Ink/Coloring: none
Accessories: Spellbinders Fancy Tags Die Cuts,  Cuttlebug Embossing Folders/Cuttlebug, Heart is cut with George and Basic Shapes on the Cricut, Corner Chomper, Grosgrain Ribbon, Flat Backed Pearls, Rick Rack. 

Monday, January 23, 2012

Love Bug

I made this card using the sketch at  I heart 2 Stamp January Sketch Challenge.


SUPPLIES:
Stamps/Images: Studio G Ladybug, Sentiment is computer generated.
Paper:  Rose Cardstock, K & Company Yuletide Paper Stack DP, Paint Sample Chips from Walmart
Ink/Coloring: Black Pigment Ink with Clear Embossing Powder
Accessories: Spellbinders Fancy Tags Die Cuts, Spellbinders Nesties Scalloped Oval, Cuttlebug Embossing Folders/Cuttlebug, Corner Chomper (Love that thing!), Grosgrain Ribbon, Flat Backed Pearls, Pearl Brad. 

Pastel Be My Valentine

This card was inspired by two challenges...
I thought the combo of embossing along with pastels would make the perfect Valentine.  It's easy to jazz up white embossed cardstock by just rubbing pastel color onto it.  It's easy and the result is very soft.

SUPPLIES:
Stamps/Images: Sentiment is computer generated.
Paper:  Georgia Pacific White Cardstock, Lilac Cardstock
Ink/Coloring: Pastels
Accessories: Spellbinders Ribbon Tag Trio 2 Die Cut, Conversation Hearts Embossing Folder/Cuttlebug, Grosgrain Ribbon, Flat Backed Lavender Pearls.

A Quick Health Update

I just took a peek at the side bar of this blog and it stood out to me in the blog archive section that there was not a single post for the year 2010.  Every once in a while something like that jumps out at me and gives me a big realization of what my illness has taken from me.  I also took a look at my stats for this blog and was shocked to see that even though I didn't have a single new post here, I had THOUSANDS of visitors over the course of that year.  That's amazing.  And for that I want to say thank you.

I figured since you are still visiting, I'd give you a quick update on my ongoing battle with Late Stage Lyme Disease.  If you didn't already know, it completely leveled me and I've been fighting my way back for about two years now.  I spent the better part of 2010 mostly bedridden but thankfully, I've come a long way since then.  I am still fighting and have a long way to go but I'm getting there.  Slowly.

The week before Thanksgiving I started my newest course of treatment which includes daily intravenous administration of antibiotics, along with the many oral antibiotics I've been taking for the past 18 months.  My doctors estimate that I need about 6 months of daily iv therapy and we are hoping that will get me into remission.  Unfortunately, I only got through 40 days of the iv's and my body started rejecting the iv needles and that forced us to stop treatment for now.  We are hoping that the month off will give my veins time to heal and I'm trying integrated energy therapy which includes hypnosis to see if that will help make the iv's easier when start up again- hopefully in a week or two.

The good news is that the iv meds were working great.  Once I got over the first 3 weeks of feeling like crap from them, I started making huge improvements and I'm happy to say that although I am still struggling, I'm doing really well.  I'm back to work part time, I'm feeling creative again and I have hope that I will get into remission... soon.

I've been back in my art studio and that feels great.  And it feels great to see how many of you still visit me here on a regular basis.  Thank you so much.  I hope to be well enough to continue to create new things to share.

Sunday, January 22, 2012

Clean & Simple Valentine

This card was inspired by 2 challenges...
 Less is More #51 "Cut it Out" Challenge- Make a card with a hole in it.
Scrap, Stamp & Doodle "Have a Heart" Challenge- Make a card with a heart on it.
 The heart is a wooden heart from the craft store that I painted white and stamped with black ink.  It is added to the card with dimensional tape.  

SUPPLIES:
Stamps/Images: SU Natural Beauty on Heart, Sentiment is computer generated.
Paper:  White Card with Cut out by Studio G (pack of 8 with envies at Walmart is only 99 cents), Black and White patterned paper from my scrap drawer.
Ink/Coloring: Permanent Black Ink on Heart
Accessories: Spellbinders Fancy Tags for Sentiment, Circle Punch, Swarovski Crystals, Wooden Heart, White Acrylic Paint.  

Fleur De Lis Valentine

This card was inspired by the following 3 challenges.  I just love the sketch, love the challenge to dig out something old from my stash and I love that Valentine's Day is right around the corner and this love challenge was perfect.  
 My "something old" is my Spellbinders Fleur De Lis Pendant die cut set.  I bought that set at least a year ago, cut out ONE shape with it and threw it in a drawer.  I found the shape I cut laying around this week and created this card with it (scroll down, it's the second card in the post) but for this card, I actually got out that die cut set and used it.  I used three different shapes from it and I have to say I love it.  I don't know why I don't use it.  
 I read a tip online somewhere and I found it very helpful.  It doesn't seem to cut well with one or two passes through the cuttlebug but if you run it through twice then rotate it 90 degrees and run it through once or twice more, it cuts perfectly.  

And here's the inside.  I almost always make the inside match the card, not only because it looks so nice but it makes the card more sturdy.  Sometimes there are so may layers on the front of the card that the back panel needs some reenforcement to compensate for it and adding layers to the inside really balances it out.  

SUPPLIES:
Stamps/Images: Sentiment is computer generated and cut out with Spellbinders Fancy Tags.
Paper:  DCWV Street Lace Paper Stack,  Georgia Pacific White Cardstock, Black Cardstock
Ink/Coloring: none
Accessories: Spellbinders Fleur De Lis Pendant Die Cut Set, Spellbinder Fancy Tags Die Cut, Circle Punches, Rose Swarovski Crystals

Saturday, January 21, 2012

Challenges Galore Valentine Card

This card was inspired by the following 4 challenges:
 Card Patterns Sketch 149 - I love this sketch.
 I used the Cricut with the Accent Essentials cartridge to cut the shape of the card.  I cut two pieces and glued them together at the top with a score line to make the card easy to open.  

SUPPLIES:
Stamps/Images: none
Paper:  DCWV Four Seasons Paper Stack,  Georgia Pacific White Cardstock, Rose Cardstock
Ink/Coloring: none
Accessories: Accent Essentials Cricut Cartridge (Card shape), George & Basic Shapes Cricut Cartridge (Circle and Hearts), Embossing Folder/Cuttlebug, Grosgrain Ribbon, Lace, Assorted Metal Findings and Buttons, Pearl Head Pins, Flat Back Pearls, Organza Ribbon Flowers.