Showing posts with label Cuttlebug. Show all posts

Sunday, February 19, 2012

Embossed Grapes

I made this card using a sketch at a challenge blog that I later realized that has rules that you can only use Stampin Up supplies in order to play along with them.  I think that just stinks so I won't even mention who they are.  

I made this card by embossing a brass stencil with the cuttlebug and then tearing around the edges of the embossed rectangle it made.  This is a great way to put your old brass stencils to use.  Emboss them with the embossing mat the same way you would spellbinders dies.  
 After embossing the grapes, I held the stencil over the embossed image and rubbed some green pastel chalk over it to highlight the grapes.  

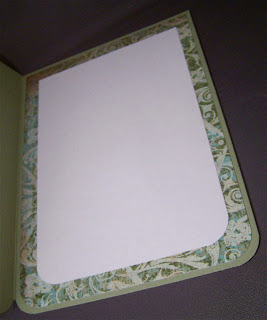
 Here's the inside:

SUPPLIES:
Stamps/Images: Sentiment is computer generated, Grapes brass stencil embossed with cuttlebug and highlighted with green pastel chalks.   
Paper:  Georgia Pacific White Cardstock, Moss Cardstock, K&Company DP
Ink/Coloring: Pastels
Accessories: Spellbinders Die Cuts- Fancy Tags, Button, Ribbon, Peridot Crystals, MS Arch Lattice Punch,  Tearing ruler.

Thursday, February 16, 2012

White on White Birthday Card

 This white on white birthday card was inspired by the following two challenges:
 I've been using a lot of computer generated sentiments lately.  I find it easier to make what I want on the computer and print it out than to keep buying sentiment stamps.  Is that cheating?  I'm not sure.  I thought I'd share with you how I make my sentiments.  

I print out what I'd like in the size I'd like on either plain paper or a large label.  If it's on plain paper, I use my xyron to add adhesive to the paper and stick it to white cardstock, or I stick the label to white cardstock.  Then I can easily cut that out with a Spellbinders die and use it on my card.

If your printer can handle printing on cardstock, then you can do this even easier and print right on the cardstock.  There's no limit to your sentiments this way.  Sentiments, sizes and fonts are limitless.  
 Here's the inside.  I always make the inside match the card not only because it's a nice detail but with layers on the front of the card, the card is more balanced when it has at least one layer added to the inside.

SUPPLIES:
Stamps/Images: Sentiment is computer generated 
Paper: Georgia Pacific White Cardstock
Ink/Coloring: none
Accessories: Spellbinders Beaded Oval Dies,  Grosgrain ribbon, Lace, Buttons, Cuttlebug/Embossing Folders, Flat Backed Pearls.

Sunday, January 29, 2012

Colour Create #88- Pink & Green

 This card was made for the Pink & Green Color Challenge at Colour Create this week.
 In my collection of miscellaneous items I've received from swaps over the years, I found this 6x6 piece of green baby designer paper and the round green baby rub on and they went so well together that I made a card for this challenge.  
 Here's the envelope.  It's a nice touch to emboss the back flap of a plain envelope to match the card.  So easy to give it a nice matching detail.  

SUPPLIES:
Stamps/Images: Sentiment is a rub on from my stash.
Paper:  Blush Cardstock, Georgia Pacific White Cardstock, DP from my stash.
Ink/Coloring: none
Accessories: Nesties Round Die Cut Set, Accent Essentials Cartridge/Cricut for Scalloped Square, Corner Chomper, Grosgrain Ribbon, Cuttlebug/Embossing Folder, Plastic Baby Pin (from the party favor section of the store), Assorted Paper Flowers, Brad, Flat Back Green Crystals.

Saturday, January 28, 2012

"Quilted" Baby Card

 Here's the second baby card to congratulate one of my nieces.  
This one is a "quilt" card.  The main panel of the card is embossed which gives a nice look.  
 The "quilt" is made by punching squares out of embossed white cardstock that is rubbed with pastels to give it some color.  The squares are then glued to the card to resemble a quilt.  
Easy peasy with nice results.


SUPPLIES:
Stamps/Images: Sentiment is computer generated
Paper:  Georgia Pacific White Cardstock and Baby Blue Cardstock.
Ink/Coloring: Pastels- rubbed over embossed white cardstock for soft color.
Accessories: Spellbinders Ribbon Tag Trio 2 Die Cut, Square Punch,  Corner Chomper, Grosgrain Ribbon, Cuttlebug/Embossing Folders, Plastic Baby Pin (from the party favor section of the store).

Baby Card

I have a couple of nieces who are pregnant and that is so exciting.  This is a simple baby card to congratulate one of them.  I love the white on white layers when you emboss one of them with the Cuttlebug.  It's such a nice, clean look.


SUPPLIES:
Stamps/Images: Sentiment is computer generated, Baby Rattle Stamp by SU.
Paper:  Georgia Pacific White Cardstock and Pink Cardstock.
Ink/Coloring: Brown Ink/Sponge for Distressing. Pink, Blue & Yellow Embossing ink embossed with clear embossing powder.
Accessories: Nesties Square Die Cut,  Corner Chomper, Grosgrain Ribbon, Cuttlebug/Embossing Folders, Plastic Baby Pin (from the party favor section of the store).

Wednesday, January 25, 2012

Paint Chip Valentine

This Valentine card was inspired by the following challenges:
 I love the sketch at CPS and it combined well with the heart and the zig zag challenges.  The zig zag challenge lead me to the "out with the old" challenge because it immediately made me think of the rick rack that I've had hanging around and never use.  I think it is perfect for this card.  

SUPPLIES:
Stamps/Images: Sentiment is computer generated.
Paper:  Georgia Pacific White Cardstock, Paint Sample Chips from Walmart
Ink/Coloring: none
Accessories: Spellbinders Fancy Tags Die Cuts,  Cuttlebug Embossing Folders/Cuttlebug, Heart is cut with George and Basic Shapes on the Cricut, Corner Chomper, Grosgrain Ribbon, Flat Backed Pearls, Rick Rack. 

Monday, January 23, 2012

Love Bug

I made this card using the sketch at  I heart 2 Stamp January Sketch Challenge.


SUPPLIES:
Stamps/Images: Studio G Ladybug, Sentiment is computer generated.
Paper:  Rose Cardstock, K & Company Yuletide Paper Stack DP, Paint Sample Chips from Walmart
Ink/Coloring: Black Pigment Ink with Clear Embossing Powder
Accessories: Spellbinders Fancy Tags Die Cuts, Spellbinders Nesties Scalloped Oval, Cuttlebug Embossing Folders/Cuttlebug, Corner Chomper (Love that thing!), Grosgrain Ribbon, Flat Backed Pearls, Pearl Brad. 

Pastel Be My Valentine

This card was inspired by two challenges...
I thought the combo of embossing along with pastels would make the perfect Valentine.  It's easy to jazz up white embossed cardstock by just rubbing pastel color onto it.  It's easy and the result is very soft.

SUPPLIES:
Stamps/Images: Sentiment is computer generated.
Paper:  Georgia Pacific White Cardstock, Lilac Cardstock
Ink/Coloring: Pastels
Accessories: Spellbinders Ribbon Tag Trio 2 Die Cut, Conversation Hearts Embossing Folder/Cuttlebug, Grosgrain Ribbon, Flat Backed Lavender Pearls.

Saturday, January 21, 2012

Challenges Galore Valentine Card

This card was inspired by the following 4 challenges:
 Card Patterns Sketch 149 - I love this sketch.
 I used the Cricut with the Accent Essentials cartridge to cut the shape of the card.  I cut two pieces and glued them together at the top with a score line to make the card easy to open.  

SUPPLIES:
Stamps/Images: none
Paper:  DCWV Four Seasons Paper Stack,  Georgia Pacific White Cardstock, Rose Cardstock
Ink/Coloring: none
Accessories: Accent Essentials Cricut Cartridge (Card shape), George & Basic Shapes Cricut Cartridge (Circle and Hearts), Embossing Folder/Cuttlebug, Grosgrain Ribbon, Lace, Assorted Metal Findings and Buttons, Pearl Head Pins, Flat Back Pearls, Organza Ribbon Flowers.

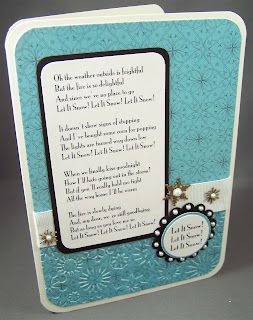
Clean & Simple #174 and Fussy & Fancy Let It Snow

 I really liked the sketch on this week's Clean & Simple Challenge #174 and I decided to combine it with Fussy & Fancy's Let it Snow Challenge since we are expecting a snow storm tonight and I'm hoping to be snowed in my art studio this weekend.  
I printed the lyrics to "Let it Snow" and used patterned paper by Me and My Big Ideas.  
I added a little bit of snowflake embossing, a few metal snowflake charms and tons of flat back pearls.

Thursday, July 14, 2011

Stamp Something- Bugs & Butterflies Challenge

 This week's challenge at Stamp Something is to make a card with bugs or butterflies.  I chose dragonflies.  I made this card for a good friend's birthday.  I love black and white.  


Friday, February 4, 2011

One Sheet Wonder - 2nd Card

 Here is the second of five cards for this One Sheet Wonder Project.  The background paper was made using the White Outline Techinque and Twinkling H2O watercolors.  Click here for easy directions on how to do the White Outline Technique.
 This giant flower was created by layering several different sized flowers from my stash together.  The pearl brad in the center holds all the layers together nicely.  I used a little green ribbon to create the illusion of leaves.
 And here's the inside of the card.  It's so easy to jazz up the inside by just adding a strip of background paper scrap.
Once I share the other three cards with this project, I will add a post showing the whole project.


Stamps/Images: SU
Paper: Marco's watercolor paper, Coral and Banana Cardstock
Ink/Coloring: 
Accessories: Pearl brad, Assorted Flowers, grosgrain ribbon

Wednesday, February 2, 2011

A Late Challenge Card- CPS 202

This is the first card of my second One Sheet Wonder project this week.  I used a card sketch from last week's Card Positioning Systems challenge which is pictured on the right.  I'm too late to add it to their links but that's okay.  Better late than never.

I made the background paper for this project using the White Outline Technique again. It's so easy and makes such a beautiful background.  Click here for easy directions.  I used Twinking H2O watercolors and it gives it a beautiful shimmer.

I was able to make 5 cards with this one sheet of handmade background paper and I'll be sharing them all as well as the whole project.