Wednesday, September 30, 2009

New Pencils & A Simple Card


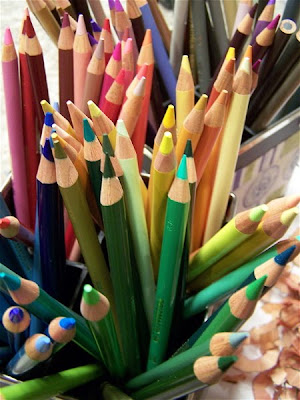
Aren't they gorgeous? They even smell good! You know what I mean? It's like the new car smell but in art supplies. (Yes, I do know I'm crazy....my husband seems to enjoy it though, so don't worry too much).

I'd like to take moment to introduce you to my new Prismacolor pencils. Readers, meet my pencils.... Pencils, meet my readers.... I think you'll be seeing a lot of each other from here on out.

I have been wanting these pencils for years and I just never sprung for them. Now that I've started selling off all of a certain company's stamps, I have a little fun money and I finally decided to spring for them. I got them for a steal on ebay, which makes the whole deal even sweeter.

To my surprise when I opened the tin of pencils, none of them were sharpened so I had to do that by hand. I'm too impatient to wait to buy an electric sharpener so I used the little tiny hand sharpener that came with the set. The colored pencil shavings looked so cool all piled up... check it out....
There's something kind of fun about that, right?!

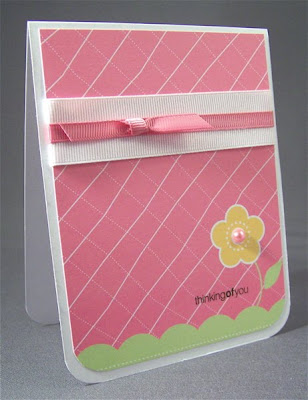
Tonight I'm sharing a super simple card with you. Here it is:
It's a simple white cardstock base with designer paper from The Sweet Stack slab by DCWV. I just trimmed the paper to highlight the flower on it.
Some ribbon, a pearl and a thinking of you rub-on sentiment make this card perfect and simple. Perfectly simple perhaps?
Here's a closer look.

I hope your week is off to a great start. I'm getting lots of work done- aka lots of jewelry made and shipped to customers. All is good! See you soon!

Sunday, September 27, 2009

My first Nesties Card

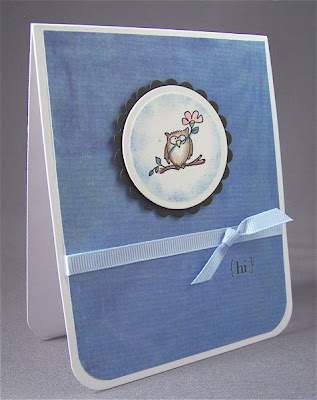
Don't get too excited... it's just a simple card, but it is technically my first card made with my new Nestibilities dies. I'm sending this card to my son at Fort Sill this week.
This card uses a white cardstock base with some blue designer paper to start. I cut a circle with my nesties and a scallop mat in black to go behind it. I kept the nestie die in place to add some blue ink to the background and stamped the owl which is from a $1 set of Studio G clear stamps.
I colored the owl with markers and a blender pen because my new set of prismacolor pencils isn't here yet (can't wait!). The "hi" sentiment is a rub-on from my extensive stash.

I am visiting my sister this weekend and I stopped at Joann's, AC Moore's and Michael's on the way here, armed with 40% off coupons. I plan to do that again on the way home tomorrow. I got some great stuff today and can't wait to get home to play! AC Moore's had a sale on Inkadinkadoo clear stamps and I bought about 8 sets.... that should give me lots to play with when I get back home!

Enjoy the rest of your weekend!

Saturday, September 26, 2009

Did you miss me? I'm back!!!

(Warning: Long rambling post ahead... I think I was gone too long!)

Hello again! It's been a couple of weeks and I just couldn't stay away any longer! Did you miss me? *grin*

I have lots to share tonight but first, I would like to share a picture of my brave and wonderful son at his graduation from Army Basic Training last week. Isn't he handsome? I'm so very proud of him! He's still only 17 and has finished basic training and now has moved onto his advanced individual training. He should get some time at home around Thanksgiving before his first deployment. We don't know where that will be yet but I'm praying that he will end up where he is supposed to be and that he will stay safe.

It's an amazing thing when your child joins the military. I'm starting to realize the range of emotions that you feel. The immense pride that I feel is matched by fear... and then there's the missing him part. I miss him terribly!

Okay, let's move on before I cry....

I can't believe how many people have visited my blog in the past couple of weeks. I guess the controversy regarding a certain unnamed stamp company has caused a surge of visitors. I was surprised that the majority of comments left were positive and I was also surprised at how many demonstrators from that same unnamed company are not happy with me expressing my opinion. All I can say is C'est la vie!

My blog has a stat counter that tells me where visitors are coming from and apparently my blog and I have been part of some discussion on the demo only (private to demos only) forum over at Splitcoaststampers. I find this very interesting but again, c'est la vie!

My first round of ebay sales is done and shipped. It went very well. I have about 150 more stamp sets to go and hopefully I will get that done this week.

I've been using the funds from the ebay sales to start purchasing new things for my art studio and it's like Christmas here. While I was in Oklahoma visiting my son, I found a Hobby Lobby and I bought some great stuff there. I picked up a Corner Chomper, which is so awesome I just can't stand it! I love that it punches two different sizes of rounded corners and does it so effortlessly. I also got a Cropadile Big Bite. I can tell already that it's going to get a lot of use. I'm always wishing my hand held hole punches would punch further in on cardstock and this will reach anywhere.

I also got my first few sets of Nestibilites. I think I might be the last stamper on Earth to take the plunge! Heck, it wasn't that many months ago that I bought myself a Cuttlebug! I've been behind on the trends over here for sure.

But, I love the Nesties so far. When I realized that I needed a "tan embossing mat", I ran right out to Home Depot and picked up a package of "plumbers gasket material" instead. I remembered reading about that online somewhere and low and behold, it works perfectly!

Which leads me to the card I would like to share. As I was playing around with embossing with Nesties, I remembered that I still have some brass stencils around and wondered if I could emboss them with the cuttlebug and gasket material in the same way. Sure enough, it works great!

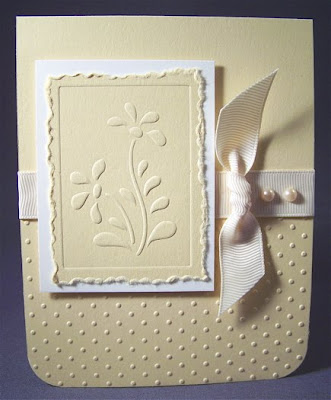
Here's the card I made:
Isn't this pretty? It' so simple. I used the gasket material (aka embossing mat) to emboss with a brass stencil on so saffron cardstock (there is a photo of the stencil and the gasket material below.) Once the stencil was dry embossed, I used a tearing ruler to tear around it and matted it with ivory cardstock.
I used a swiss dots embossing folder to emboss the bottom half of the card front and added ivory grosgrain ribbon to cover the edge of the embossing. A small piece of ribbon tied in a simple knot and added with a glue dot makes a nice "bow".
A couple of pearls finish it off nicely.
Here'a a photo of the brass stencil I used and the plumbers gasket material that works as an embossing mat. It was in the plumbing department at Home Depot and cost about $4.00-5.00 for 2 6x6 inch sheets of it.

Two other notable purchases: Last night I scored a set of 120 Prismacolor pencils on ebay for a great price and can't wait for them to get here. I am really looking forward to playing with those! I also purchased the 3M ATG714 adhesive gun and it might be one the greatest things I've ever bought. It is so smooth and easy to use and very economical once you spring for the gun. I'm still deciding on new stamps so stay tuned for more info on that.

I guess that's about it for tonight... if you are still reading this, thank you for being so loyal! I am looking forward to playing with new products and sharing new things here!

Edited to add:
Here's the sandwich I used in the Cuttlebug to emboss with a brass stencil:
A plate (thick white one)
brass stencil (see note below)
cardstock to be embossed
rubber gasket (1)
3 sheets of cardstock as a shim
2 B plates (thinest ones)

Note: If the stencil has the company name etched in it, face that down or it will emboss too.

Thursday, September 10, 2009

Paint Chip Card and My Thoughts about Stampin Up- A New Direction for this Blog

Today I'm sharing with you a "clean & simple" card made with paint chips that I made for my last batch of Cards for Heroes cards. I just love the paint department at Home Depot! Not only because I always seem to be painting something but I also love to pick up some extra paint chips to play with (they don't seem to mind).
This card uses a paint chip card that has 4 different shades of the same color purple. I ran it through the Cuttlebug with the paisley embossing folder and then used a sanding block to take some of the color down to the white core.
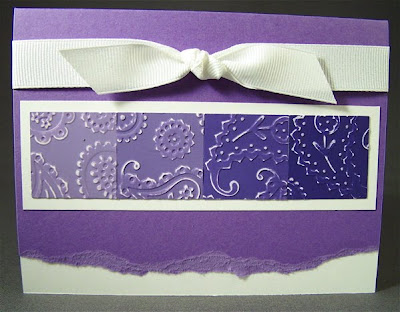
Once I had the paint chip sanded nicely, I used a square punch to cut a square from each of the four colors and mounted them on some white cardstock with a border.
I attached that to the card with some white grosgrain ribbon and tore the very bottom of the front of the card. I used some double stick adhesive to add some white cardstock to the front flap and it's done.

I hope you enjoyed this easy one.

Now, on to another topic....Let me start by saying that for the next couple of weeks I won't be posting very much here to my blog. There are two reasons for this. First, I am leaving next week for a trip to Fort Sill, Oklahoma to attend my 17 year old son's graduation from Army Basic Combat Training. I'm so excited to see him that I just can't wait. My husband and I are flying down there to see him graduate and spend some time with our new soldier. I could not be more proud.

I'm super busy leading up to the trip and I doubt that I'm going to have much stamping time because my studio is all torn apart right now.

And that leads me to my second topic.... Stampin Up. I've been thinking very carefully about what, if anything, I wanted to say about this. Unless you live under a rock, I'm sure you've heard the news and all the talk that is going around about Stampin Up's new demonstrator policies being set forth this month. I have some thoughts and news that I'd like to share.

First, let me tell you that I am not a demonstrator. I'm sure some of you are wondering why I have any opinion at all if I am not a demonstrator and I will tell you why. I was a demonstrator for many years and I've been buying SU products for at least 15 years. And I mean, exclusively SU to the tune of at least $10,000 over those years. You may have already noticed that when I post anything here on my blog it is pretty much all SU, all the time.

I had a love affair with SU and would never buy anything else. Every year I bought all the in-colors. When clear stamps started to be all the rage, I resisted even trying them because I was very partial to SU's wood blocks and sets. I coveted my collection of stamp sets. I designed my studio with lots of storage for all of my SU sets and had them all cataloged in a binder. I used only SU cardstock colors, ink and markers. In my mind, there was nothing else worth buying.

Then they upset me.

I started seeing rumblings about SU online last week so decided to go look up the new demonstrator agreement to read it for myself. And I have to say that I am surprised and appalled by what Stampin Up is trying do. The changes that they are putting forth are unbelievably intrusive and restricting to any demonstrator that stays with the company after September 30th.

You can read the new demonstrator agreement (IDA) for yourself by clicking here. Pay close attention to section 9.

And you can read the FAQ that was released by Stampin Up by clicking here.

So what does all of this mean to me? And why do I care if I am not even a demonstrator? I care because this goes against everything I believe in for women and women in business. In any business, including a Stampin Up demonstratorship, business relationships are a very important aspect of success. In any business relationship there is give and take and SU is taking away the "give" part while promoting the "take" part. What do I mean by this? Well here's an example: When people visit my blog and see all SU products all the time and want to know where they can buy them, I can refer them to my SU demonstrator and I can even put a link on my blog to her site. BUT, my demonstrator cannot refer me and my small charm and embellishment business to her customers- not with a link on her site or even in an email. She can't even send a personal email to her sister saying "hey, I met this really cool lady who sells awesome charms that look great on cards."

Stampin Up wants control of all demonstrator's complete online presence including websites, emails, facebook, twitter, etc. And I mean ALL of their online presence whether it be SU related or personal... including personal emails and personal blogs. This is just plain wrong.

I am the cofounder of a large women's business networking group and one of the basic principals that we founded the group on is "embrace your competition". Your competition can be your best business ally if you handle the relationship in the right way. Nothing will hurt your image or make you look more petty than walking into a room and being uncomfortable because your competition is there. In my opinion Stampin Up is looking very petty and insecure right now. There is enough business out there for everyone, even in this tough economy and there's no need to take the attitude that SU is taking right now. My jewelry business, which is my full time business, is an example of that. My success is a direct result of being contacted by and working with my biggest competitor.


I also think that Stampin Up is being very unfair to their demonstrators because they are going to have a hard time promoting their product if they cannot participate in the real papercrafting world. It's all about networking and getting to know people. You aren't going to get very far when you are restricted to the point that you can't form a synergistic relationship with someone else in the business or papercrafting industry. Why would online forums and other online resources want to have SU demonstrators participating if they get no reciprocity from the demonstrators or Stampin Up. Stampin Up is trying to build one sided relationships that only benefit them and business does not work that way.


In my opinion Stampin Up has a wonderful, quality selection of exclusive products and should be able to stand on their own in the competitive papercrafting market without imposing these strict rules. If they are concerned and want to look at their business practices, they should consider not carrying things are not exclusive to them (because the ones they carry are overpriced) and expand their exclusive line. They should take a look at pricing or at the percentage they are paying their demonstrators, which in my opinion is low but I guess it's in line with other direct sales companies.


So now that I've told you how I feel, let me tell what I've decided. I've decided that I no longer want to be a customer of Stampin Up and I no longer want my blog to be one big Stampin Up promotion. Why should I allow my blog to be one big Stampin Up promotion when they take the attitude that they are? And to that end, I've decided to sell off all of my Stampin Up stamp sets and supplies. This may sound harsh but I feel very strongly about not supporting or promoting a company that takes this kind of business approach.


I've spent the last couple of days listing my stamp sets on ebay for a starting price of 99 cents each. I've got about 120 sets on there starting today and I'm trying to find time to list the rest- about another 150 sets. I am hoping that they all sell for enough money that I can place some decent orders with companies like Papertrey (which carries a nice line of coordinating papers and inks), GinaK (who seems to be a class act and has some great stamp images) and maybe even some Close to My Heart to replenish my stamps and supplies.


So back to my original point.... with all of this going on, my studio is in disarray as I sell off all of my stamps and buy new. This is going to make it difficult to create and post to my blog for the next couple of weeks. I hope if you are a regular reader of mine that you will stick with me and wait to see what new stamps and new projects this change brings.


As for Stampin Up... just as demonstrators will never be able to mention another company on their blogs, this will be the very last time they are ever mentioned on my blog.


One last thing.... I know that this whole situation has caused much debate all over the internet and I also know that some blogs that state opinions are being bombarded with comments both good and bad. Please know that I do not mean to start or continue controversy by stating my opinion here. I felt the need to state my opinion because it's something I feel strongly about and it is significantly changing the course of this blog. I hope you understand that.


Thanks for reading this far and I look forward to taking this blog in a new direction soon. I hope you'll join me.


(Edited to add: I've been asked to share my ebay name so that some can take advantage of my sale. My ebay seller name is moonwitch106. Thanks for taking a look at my items and remember, there will be more listed next week too.)
Wednesday, September 9, 2009

First Day of School!

For the first time in 13 years I don't have a child going to their first day of school... but I do have a nephew who started kindergarten today! He's really my great-nephew but that makes me sound old, and I'm not old....I swear!

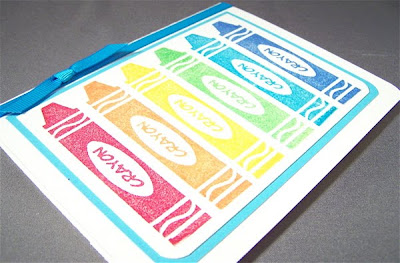
I made this card to send to him to congratulate him on starting school:
Cute, right? Simple too. I just stamped the crayon image several times, each time with a different color pigment ink. I embossed them with clear embossing powder and they look so nice and shiny... just like all school supplies do on the first day of school!

It'll go in the mail tomorrow and hopefully he'll feel special getting some special mail this week!
Here's a closer look.

Sunday, September 6, 2009

Paisley Background

Here's one more twinkling H2O's watercolor background that I overstamped with a large paisley background stamp. I used black pigment ink and clear embossing powder to give it a nice detailed look. I love the way this came out!
Here's another view.

I hope you are having a happy and healthy holiday weekend. We had a very successful yard sale all weekend (I smell new stamp supplies!) and we are looking forward to a lazy day tomorrow. Enjoy!

Thursday, September 3, 2009

Stay Put Bow

I finally found an online tutorial for the "Stay Put Bow"! Click here to go on over to Michelle Single's blog and see the fabulous video tutorial that explains it perfectly. I do this all the time and it works so well.

In the tutorial, Michelle shows how to do it when you want just a knot but I do the same thing with longer "tails" of ribbon on each side and tie a nice bow. See my other post from today to see one I did with a bow (click here). Actually there are lots of examples of this on my blog if you look around!

The bow works best for me if I tie a knot first then make a "bunny ears" bow by making a loop with each tail and tying them in a simple knot (I tie my shoes that way too, but don't tell anyone!). As you are tightening the bunny ears bow, you can adjust the tails to the bottom (before the center knot is tight) and if you keep tightening the knot and then pulling the tails to make the loops smaller and fiddle with it that way, you end up with a pretty nice bow. Does this even make sense? I hope so!

What are your best bow tying tips? Share them in the comments and I'll compile a list here for all the world! Thanks!

More Watercolored Backgrounds

How cool is this?! I was playing with the watercolored backrounds that I made with Twinkling H2Os (see this post) and I decided to try stamping one of the large detailed SU background stamps on it. I was so pleased with the results!
Otherwise, this card is really simple. It doesn't need much with that gorgeous background. On this card I stamped the large background stamp with black pigment ink and embossed it with clear embossing powder. The embossing combined with the shimmer of the background gives it an amazing rich detail and texture. It's too bad the photo doesn't show it that well.
The sentiment is from the SU set called Elegant Cheer and it's embossed also.
And here's the inside. I added a small strip of the background paper that was leftover when I trimmed the original piece to fit the front of the card. That's an easy detail that is so easy to do and adds so much to the inside of a card.

I hope you enjoyed this one! I have another great watercolor background to show you tomorrow, so be sure to stop back!

Wednesday, September 2, 2009

Autumn Watercolor Background

This is another card I made with a Twinkling H2O watercolor background (see yesterday's post for instructions). Fall is my favorite time of year and it seems to be creeping in slowly and inspiring me.
The main tree image is from the SU set Lovely as a tree and is stamped in black pigment ink and clear embossed. The two leaves and the background stamp are both from the SU set Natural beauty. The leaves are stamped on the watercolored background paper with black pigment ink, clear embossed, cut out and then adhered with sticky dots. The background word stamp is stamped in pumpkin pie dye ink. I accented the card with small strips of pumpkin pie and close to cocoa cardstock. I like the texture that the tearing gives the card.
Here's a closer look.

I have a few more watercolored backgrounds that I am hoping to play with tonight if I can sneak in some playtime!

Have a great evening!

Tuesday, September 1, 2009

Watercolor Background

When I saw this card over Second Childhood Creations, I was inspired to try some Twinkling H2O watercolor backgrounds. Here's the first one I created:
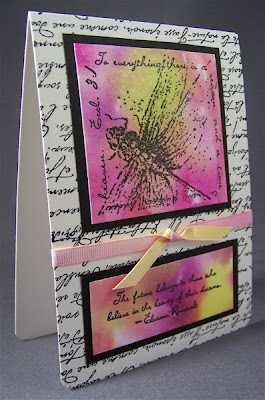
This is SO easy and the results are just stunning. It's hard to tell in the photo but it has an amazing shimmer that makes it really pop. All I did was dab the paintbrush loaded with the paint onto watercolor paper that has been spritzed with water. Dab and brush paint all over the paper and then spritz some more water and let it all run together and then let it dry. Once it's dry, stamp over it with black ink. This card is stamped with black pigment ink and then clear embossed.
The images on this card are from the set Measure of a Life by SU and the background is French Script. The card base is bristol vellum cardstock from a drawing pad that I bought at Michael's. I like the weight of it and the size (9x12) is great for making tall cards that fold on top.
Oh, and did you notice that grosgrain ribbon? Did you notice that it's a different color on each side? I saw this tutorial over at Splitcoast and decided to try it. It works so much better than I anticipated it would. I'm definitely going to do that again! By the way, I didn't seal mine as the tutorial instructs and I didn't think it needed it. The color is staying put just fine.

I hope you enjoyed this one because I made a few backgrounds while I was playing and I'm sure you'll be seeing those soon!