Friday, March 20, 2009

A Recipe Box- Altered Lunch Tin

Today I'm sharing another altered tin project that I made a while ago as a gift for my mother-in-law.  I thought I'd share it now because I haven't any time for new projects this week and it's time to start thinking about Mother's Day gifts.
This is a provocraft lunch tin and they make many different shapes of tins.  If you google to look for them, you'll find some online.  I got mine at one of the big box chain craft stores.  I used a paper pack from Oriental Trading Company to embellish this one.  I don't think that pack is available any longer but any papers would work for this.
I made a pocket inside the lid that would be handy for notes and added a cute paperclip to the pocket.
And here's the dividers.  I think these tins really make great gifts.  If you make one, I'd love to see it.

Thanks for stopping by and I hope you'll come back soon.  I'd like to thank those who said a prayer for us this week.  We are not through our difficulties yet, but I am getting back in the swing of things slowly after a really difficult week.  I am hoping to be back to regular posts by the end of the weekend.  See you then!

Wednesday, March 18, 2009

A Card Box- Altered Lunch Tin

Tonight I'm sharing an altered lunch tin project that I made some time ago for my sister-in-law. She's so great at remembering birthdays and sending out cards that this seemed like the perfect gift for her.  I gave it to her filled with a bunch of cards that I made in a one sheet wonder project- you can see those cards by clicking here.
I used designer paper and embellishments to alter the tin.  I spent a lot of time to create at template so that I could easily make altered tins, but to date, I have only made one other.  Maybe I'll share that one soon- it's a recipe box.Inside the tin, I made a pocket that holds small monthly birthday reminder lists.  There's a heart paperclip just for some added cuteness.
And some matching dividers.
I hope you enjoy this project.  I think it would make a great Mother's Day gift- and Mother's Day is quickly approaching!

Before I sign off for tonight, I have a favor to ask.  I never ask for prayers but I need to make an exception.  If you could please keep me and husband in your prayers tomorrow I would greatly appreciate it.  We are facing a situation that could alter our life significantly and we are praying it doesn't devastate us.  We need all the prayers and positive energy we can get.  Thanks so very much.  Have a great day tomorrow and I hope to see you here again soon.

Saturday, March 14, 2009

I tried a new technique!

Wow... two posts tonight after almost nothing all week!  I finally went into my studio and found some creative energy tonight after a week of being sick and so stressed that it's interfering with my everyday functions.  Tonight's creative energy was made possible by medication but I'll take whatever I can get this week!

This card is not my best work, but it's something... and I tried a new technique.  I was surfing over at splitcoast and came across a technique called blurred vision watercolor (click for directions).  It seemed appropriate since I'm medicated but really I liked the ease of it and it looks so nice.

I used the SU set Sketch an Event and stamped the leaf image with garden green on Marl paper.  I stamped them one at a time and used a blender pen to blur and soften the lines.  Then I did the same with the butterflies using the berry breeze kalidacolor ink pad.  I embossed the panel with the cuttlebug swirl folder and sponged some ballet blue ink on the edges.
I stamped two extra butteflies on another sheet of marl paper then I blurred them and cut them out.  I attached them with glue dots in the center and folded up the wings to make them 3 dimensional.
I added some SU ribbon and mounted the whole panel on an eggplant envy card base.  This is a pretty simple card without all the layers I usually do, but I love the color and the spring feel.

I want to thank you all for stopping by and continuing to support my artistic efforts here.  It means so much to me.  I should also let you know that this coming week is only going to be even more stressful for me and you may not see me here much, if at all.  Hopefully I will pull through this week and get back to normal after that.  Thanks for being patient with me- I'm going trough an extremely difficult time.

Oh, BTW, if you haven't already, scroll down to the next post to see the other card I made tonight for a color challenge.

Color Inspiration Challenge #45

Here's my card for the KWerner Design Color Inspiration Challenge #45.  The challenge is to make a card using only black, gray and white.  No other colors are allowed this time.  It was actually harder than I thought it would be.  I really wanted to add bit of a bright color like red, hot pink or lime green.  But I didn't....
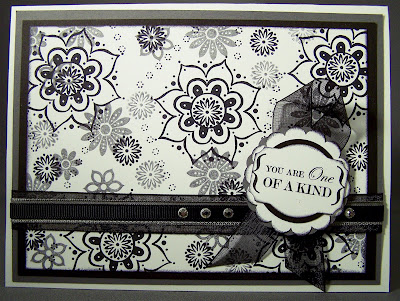
I used the set One of a Kind by SU and I randomly stamped the main panel with black ink and then went back and filled in with the 3 flower stamp and gray ink.
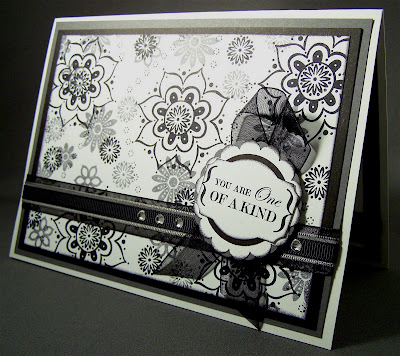
The ribbon is all SU and the medallion is made with the label punch layered over two circle punch layers and all that is layered over two scalloped punches.  For the two scalloped punches, they are the same size and I just layered them so the scallops were in between each other (does that make sense?).
I used crystal clear Swarovski rhinestones to embellish the ribbon.  They glue down best with Elmers white glue.  I wish I could photograph them better- they look so much nicer in real life!
And here's the inside.  Hope you like it!

Monday, March 9, 2009

Two Challenges in One: CPS106 & Color Throwdown 32

Tonight I'm sharing a card that combines two challenges in one: Card Positioning Systems #106 and Color Throwdown #32.  I've been in bed all weekend with a nasty "bug" and when I finally went upstairs to play for a while tonight, a challenge was just the doctor ordered to get me in the swing of things.  And two challenges are even better.

The CPS106 challenge is card sketch that you can see by clicking here and the Color Throwdown #32 is a color challenge using Pretty in Pink, Barely Banana and Regal Rose (click here to see the challenge).

Here's my card:
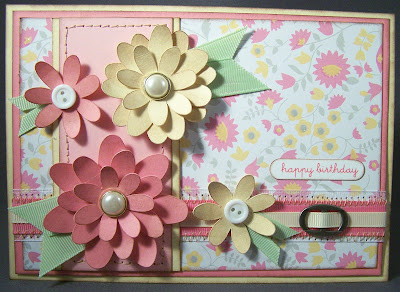
I used my Cricut (Basic George and Shapes) to cut the flowers.  I cut them in different sizes and layered them on top of one another.  Before I attached them together, I sponged them with close to cocoa ink and used a dowel to curl the petals upward.  

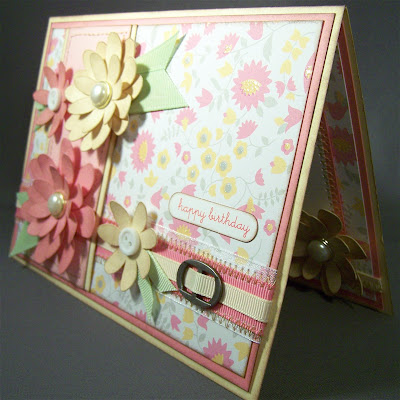
I used certainly celery ribbon from SU to make leaves for the flowers and the center pearl brads are from Michael's Bride's line.  The metal ribbon slider is from SU's hodgepodge hardware in pewter.  
I used my sewing machine to stitch a straight stitch around the flower panel and I sewed the ribbon in place with a zig-zag stitch.  Cool, right?  
The happy birthday sentiment is a rub-on from my stash and that pretty designer paper is from The Sweet Stack that I've been using a lot lately.
I just love these 3 dimensional Cricut flowers!  Why didn't I think of this sooner?!
And here's the inside with another flower and some more stitching.  The only down side to this card is that it would be best to be hand delivered.  I think that the mail would make the flowers too flat and that inside flower is really dimensional.  I'll be sure to hand deliver this card to someone special.

Thanks for stopping by.  I hope to see you again soon.  

Saturday, March 7, 2009

Well Behaved Women

Today I'm sharing another card with sewing.  I am really loving the results I'm getting with my sewing machine.  My poor sewing machine has been neglected for so long that I had to dig out the manual to figure out all the different stitches.  I have a feeling it won't be seeing fabric again for a while- unless I sew fabric to a card.  Ooohhh, that's an idea!

Well, here's my newest card:
On this card, I stamped the images with black craft ink and used clear embossing powder for a raised image.  I can't remember the last time I heat embossed either.  I'm breaking out all kinds of new and old stuff lately!
I used watercolor pencils and a blender pen to color the image and embellished it with swarovski crystals.  That makes her necklace, ring and the center of the flower in her hat stand out.  It's hard to get a good picture of those crystals- in real life, they are stunningly gorgeous.
I did lots of zig-zag stitching on this card and I love the texture it gives the card.  I'm really getting the hang of it now.
And here's the inside of the card.  

Hope you enjoyed this one.  Have a great weekend!  We have unexpectedly beautiful weather here so we may get outside a little bit.

Friday, March 6, 2009

Button Bear & Sewing

Tonight I broke out my sewing machine.  I had to dust it off and remember how to use it.  It's been so long!  

I've been seeing more and more cards that are sewn and they are so nice that I thought I'd give it a try.  I sewed some scrap cardstock first and it didn't take long to get the hang of sewing on paper.  I made a card using my Button Bear set again and I love the texture that the sewing gives the card.
I colored the bear with watercolor pencils and a blender pen.  The designer paper is from The Sweet Stack and I used brocade blue cardstock and ribbon.  The flowers are from Oriental Trading Company.
I used tan thread and sewed a zig-zag stitch around the bear layer.  I goofed it up a little bit at the top corner, but I hid that with a pink flower.  {grin}  Works for me... it's all good!
Here's the inside.  I cut the circles with my Cricut and sewed a zig-zag stitch around it.  
I'm really pleased with how this came out.  I am going to have to find a spot in my art studio for my sewing machine to live.  I have a feeling I'm going to be using it a lot more!

Thursday, March 5, 2009

Button Bear- Using a Really Old Set

Once again, I dug out a really old set to show some love.  This set has been neglected for way too long.  I brought it out with the intention of selling it because it's been years since I've used it, but now I'm not sure I want to part with it!   I can't decide.  I'm really not into cute at all, but there's something adorable about this bear.
I colored this adorable little bear with watercolor pencils and a blending pen.  I have the large set of Staedtler watercolor pencils and I love them.  I also stamped the bear a second time and cut out the feet, hand and bow and added those pieces to my card to make 3 dimensional pop ups.  
I stamped the hat and the gift separately and adhered them in 3D as well.  This gives a nice detail to the card.
I used SU soft sky and pixie pink cardstock along with designer paper from The Sweet Stack.  I've been using The Sweet Stack like crazy lately.  I really love that paper.  The flower ribbon slide is from Oriental Trading, the soft sky stitched ribbon is SU and the hot pink ribbon is a scrap from my jars.
Here's the inside with just a touch of detail.  

Now I'll have to decide whether to list this set on ebay tomorrow or not.  I'll sleep on it.

Thanks for stopping by!

Tuesday, March 3, 2009

Mojo Monday Challenge #76- Stella Stamper


Okay, I think I'm addicted to all of these fun challenge blogs!  Tonight I made a card using the card sketch on this week's Mojo Monday Challenge

The sketch is pictured on the right and here's my card:


I dug out a very old Stampin Up set- Stella Stamper (remember that one?!)- because it will be my next set to hit the auction block over on ebay.  I'm trying to show some love to all the stamp sets that I am selling before I part with them.   I'm even including my "last card" with each set that I'm selling.  Fun, right?
So, here's Stella in all her glory one last time.  

I colored her with Sharpie and Bic markers and then I used a blender pen and bashful blue ink to make a light blue watercolor-like border around the image.  I also used my SU creamy caramel marker for her skin because I didn't have a permanent marker that would work.  I used certainly celery cardstock as a base and the same color ribbon.   I layered the card with black cardstock and designer paper.

I used an extra layer that was not on the sketch on the front of this card.  I think I'm getting to the point where I've been layering so much that I just **can't** make a card that consists of just one sheet of cardstock as the base.  I need LAYERS and then more layers!  Until it feels like it's bullet-proof.  {grin}
Here's the inside... continuing the theme from the front.  This is a really cute set.  I wonder why I haven't used it in years?

Thanks for stopping by!  See you tomorrow I hope.

Monday, March 2, 2009

Another Gingerwood Challenge

Over at Gingerwood, my friend Jacki suggested another challenge and I loved the idea.  She suggested that we all go to our stash of stamps and find one that either has never been used, or hasn't been used in a long time.  Unfortunately, I have a LOT of stamps that fit both categories! (Many are showing up on ebay...)

I dug out Just for Fun (by SU) and made this card- and the one in the previous post.  Not only is this an old SU set, but I don't think I've ever used this particular stamp before.  Double points!!!
I used a stamp positioner to stamp this three times and it looks like a lovely spring garden.  It's totally wishful thinking since we're having a winter snow storm tonight!  I colored the image with Sharpie and Bic permanent markers.  This is my first try at that and I need to go back and see how others are getting them to blend.
All the cardstock and ribbon are from SU (Cardstock: Pixie Pink, Bashful Blue, Cameo Coral and Ivory  Ribbon: Brocade Blue on top of a bright pink scrap).  Those cool brass charm are from Montage Collage- my embellishment store.
Here's a closer look.  I think I like the look of the permanent markers for coloring.  What do you think?  

Thanks for stopping by!

CPS105 Card Sketch Challenge

Tonight I'm sharing a card that I made for my niece's birthday coming up.  I decided to use the card sketch challenge from Card Positioning Systems.

I'm really enjoying the challenges that I've been participating in lately and I hope you are finding them interesting too.  I really enjoy going to the challenge blogs and looking at everyone else's take on the same sketch.  

The card sketch is pictured above, and here's my card:
I love the color combo of green and brown as much as I do pink/brown and light blue/brown.  I've been using these combos so much lately that I'm almost out of close to cocoa and chocolate chip cardstock.  That's a crisis!  This card uses designer paper from The Sweet Stack (found here).  When I found that paper pack, I liked it but now that I've been using it, I officially LOVE it.

Before I go on, I have a confession.  For so long now, everywhere I look there are cupcake cards and images on what seems like every blog... and you know what?  They've grown on me!  I think I need more cupcake stamps....  (they got me!)
This cupcake stamp is from the SU set Just for Fun (a really old set) and I colored it with markers and a blender pen.  I used the Cricut to cut the squares and cuttlebug embossed the layers.
And here's the inside with matching ribbon and more Cricut cut shapes and layers.  

Thanks for stopping by.... if you have time, check out some of my other recent posts to see some other challenges.  Have a great Monday!

Sunday, March 1, 2009

Our Creative Corner Sketch Challenge

I've made so much progress in my art studio this weekend that it's scary!  I needed to make a birthday card for my niece so I figured, why not do another challenge?  I chose Our Creative Corner's sketch challenge.  Here's the sketch:
And here's my card:
I used designer paper from The Sweet Stack that I got at Joann's.  Even the cake image is part of one of the pages in that stack.  I love that is pink and brown!
Here's a couple of close ups of the detail.
And here's the inside.
I'm really happy with this card.  In real life it's just darling!  Thanks for stopping by... be sure to scroll down and keep reading because this is the third card I've posted in that past 12 hours.  Yay me!!!